🔥 1. L'attrait principal

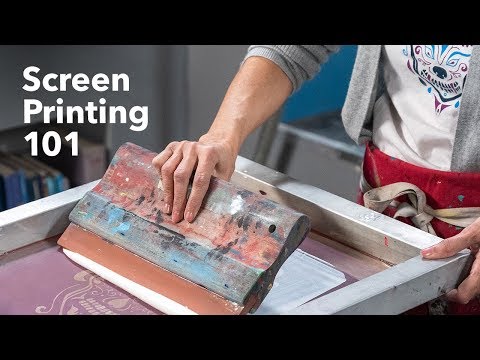
Screen printing sits at the intoxicating intersection of tactile mechanical craft and graphic design expression. There is an undeniable rush in dragging a loaded squeegee across a taut silk screen, feeling the rhythmic resistance of ink passing through micro-mesh, and lifting the frame to reveal a crisp, vibrant graphic transferred seamlessly onto fabric or paper. The process rewards method, precision, and physical touch, pulling you away from digital screens and into a satisfying world of pigments, stencils, and tactile alchemy.
Beyond the sensory joy of the pull, screen printing unlocks a deep sense of creative autonomy and production flow. Once you master the fundamental mechanics of stencil creation and ink registration, the ability to turn a blank canvas or plain cotton tee into custom apparel, poster art, or branded merchandise becomes effortless. It transforms your living room or garage into an active print workshop, offering a zen-like state of focused repetition and immediate physical results.
🗺️ 2. Le panorama
Before investing in multi-station presses and flash dryers, it helps to understand the distinct screen printing methods based on your stencil media, ink chemistry, and target substrate.
Flatbed Paper Printing (Fine Art & Poster Design)
Focuses on crisp edge definition, precise multi-color registration, and fluid water-based inks printed onto heavy cardstock or archival paper. Artists favor this method for limited-edition art prints, concert posters, and minimalist stationery.
Textile Garment Printing (Apparel & Wearables)
Designed for printing onto t-shirts, hoodies, and tote bags using flexible water-based or plastisol inks that bond durable pigments directly into cotton fibers. It requires stretch-resistant screen frames and tactile flashing techniques to ensure prints withstand hundreds of laundry cycles.
DIY Vinyl Stencil Printing (Low-Barrier Crafting)
Replaces light-sensitive chemical emulsions with vinyl decals cut on home plotters and applied directly to screen mesh. This approach bypasses light exposure units entirely, making it ideal for quick single-color graphic runs without light-proof darkrooms.
For complete beginners, a simple single-color wood-frame starter kit using water-based acrylic ink and hand stencil methods is universally recommended: this versatile setup eliminates complex multi-color alignment headaches while teaching core mesh dynamics, squeegee pressure control, and ink management.
🛒 3. Kit de départ & budget
Le minimum requis pour le jour 1. Pas de dépenses inutiles, pas d'obstacles.
ℹ️ RokkuWare est soutenu par ses lecteurs. Lorsque vous achetez via des liens, nous pouvons recevoir une commission sans aucun frais pour vous.